APPLICATIONS
RxMix facilitates the use of the RxNorm API, RxTerms API, and RxClass API by allowing users to make interactive or batch API queries and to create workflows (sequences of API calls) for their use cases.
This example illustrates the basic operations of RxMix. It is assumed that you are already conversant with RxNorm and the capabilities of the RxNorm API; with downloading and uploading data files using a web browser; and with spreadsheets.
In this example, we will look up brand names for a drug or ingredient name (e.g., we will provide ingredient name "atorvastatin" and we will discover "Lipitor").
The goal involves two calls to the RxNorm API:
We will use RxMix to automate that sequence of RxNorm API calls. We will pre-test the API calls with a single data value. We will feed a batch file of data values through the workflow. We will save the report and view it with desktop tools. We will save or share the workflow. And we will learn about using an RxNorm dataset as batch input.
In the web browser, we go to https://mor.nlm.nih.gov/RxMix/
The figure below shows the initial RxMix page.
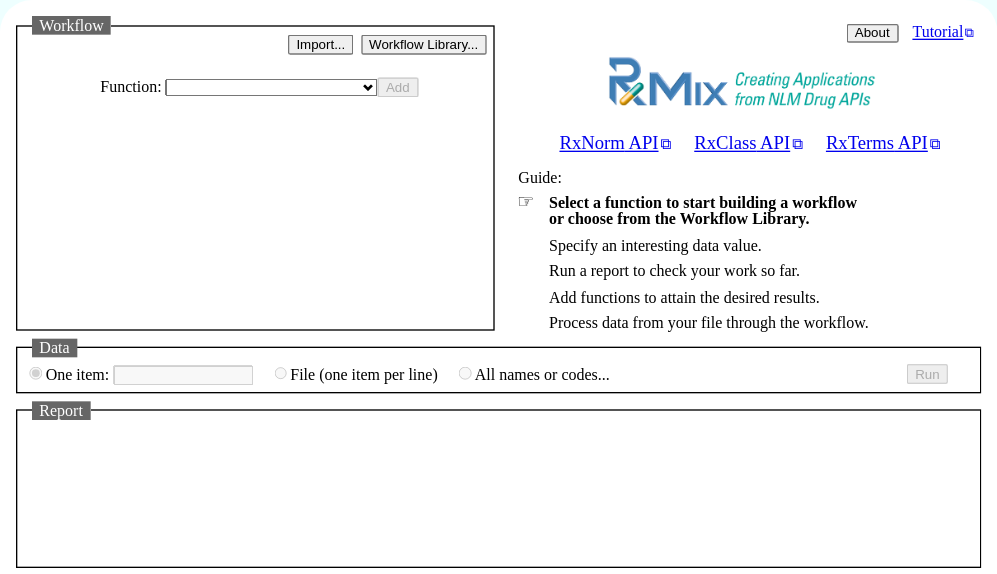
The page comprises four sections:
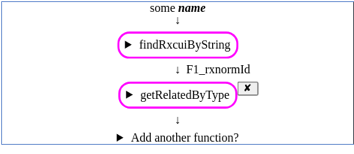
Next, we will build a workflow of the two API functions we planned.
Recalling from above, our plan is to use two API functions:
Next, we will add the first of those functions.
Here we add "findRxcuiByString" to a new workflow. We locate the "Function" selector, and we select "findRxcuiByString":
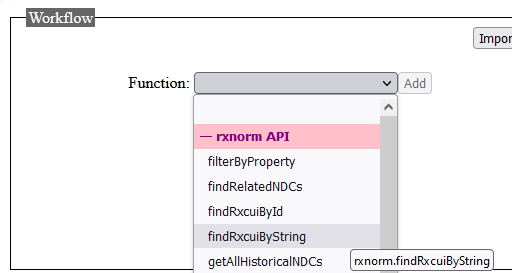
Having selected "findRxcuiByString", we choose "Add":

We review the "findRxcuiByString" options:
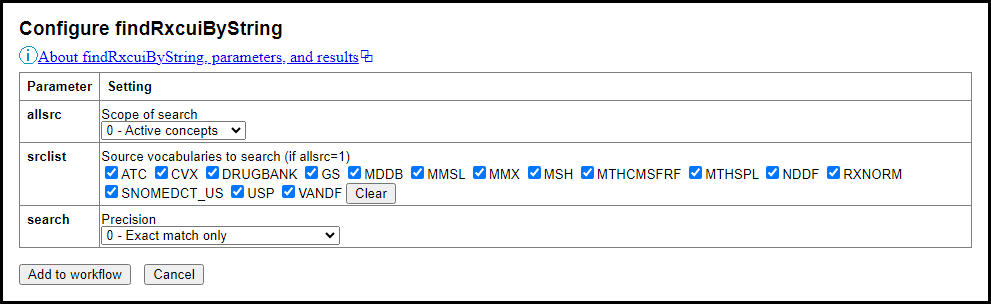
In this case, the default configuration is suitable: to find active concepts by an exact match.
We choose "Add to workflow".
Now the workflow looks like this:

(To reconfigure or replace the function, we would choose the X (delete) button, then add the desired function anew.)
In this optional step, we check our work as we go by running our sample input value through the workflow.
We locate the "Data" section and punch in our test case, "atorvastatin":

Having punched in "atorvastatin", we choose "Run".
RxMix soon reports back:

The report table shows our input (atorvastatin) and the rxnormId returned by findRxcuiByString.
Using RxNav, we can confirm 83367 is the expected RxCUI for atorvastatin.
Next, we will add the second function to our workflow.
In this step, we will complete the sample workflow by adding getRelatedByType. We return to the "Workflow" section, and within it we choose the "Add another function?" button:
We select getRelatedByType and choose Add:

We need brand names, so we select only the BN term type:
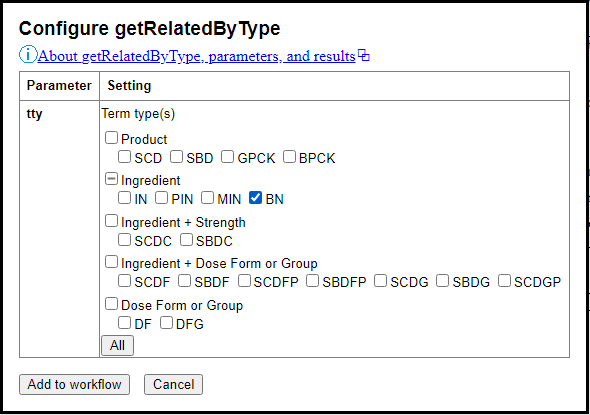
We choose "Add to workflow".
Now the workflow looks like this:
To check our work, we may (optionally) return to the "Data" section, where "atorvastatin" is still our test case, and choose "Run". RxMix updates the report, adding columns for the outputs of the second API function: rxcui, name, synonym, and tty, each with the prefix "F2" (second function) to distinguish them from any similarly named outputs of other functions we might add to the workflow.

As expected, Lipitor was among the results.
We may download the result table: choose "Download report". (If the report were much longer, we would instead be given a button to "Finish and Download" it.)
Next, we will assemble a data file of ingredient names to run through the workflow in batch.
For batch input, RxMix requires a text file with one input value per line and no headings. Values are not quoted.
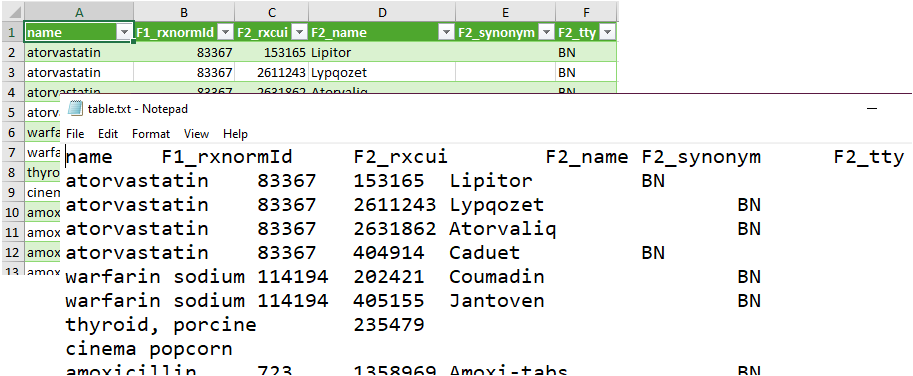
In keeping with our example, here is a file of "ingredient names", as viewed in Windows Notepad. For demonstration purposes, there are purposely some invalid or unproductive entries in this file, so we can see how they turn out in RxMix:
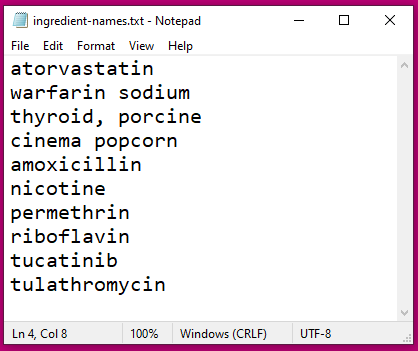
Here is the list again in case you might like to paste it into a file of your own as you follow along.
atorvastatin
warfarin sodium
thyroid, porcine
cinema popcorn
amoxicillin
nicotine
permethrin
riboflavin
tucatinib
tulathromycin
Next, we will run our batch-input data through the workflow, making a report.
We return to the "Data" section and select "File of…"
The "Choose File" button may look different in your web browser. In any case, we select our data file (e.g., the ingredient-names.txt pictured above). The selected data file is reflected beside the "File of" label.

Having selected a data file, we choose Run.
We can look over the first few results before we choose "Finish and Download".
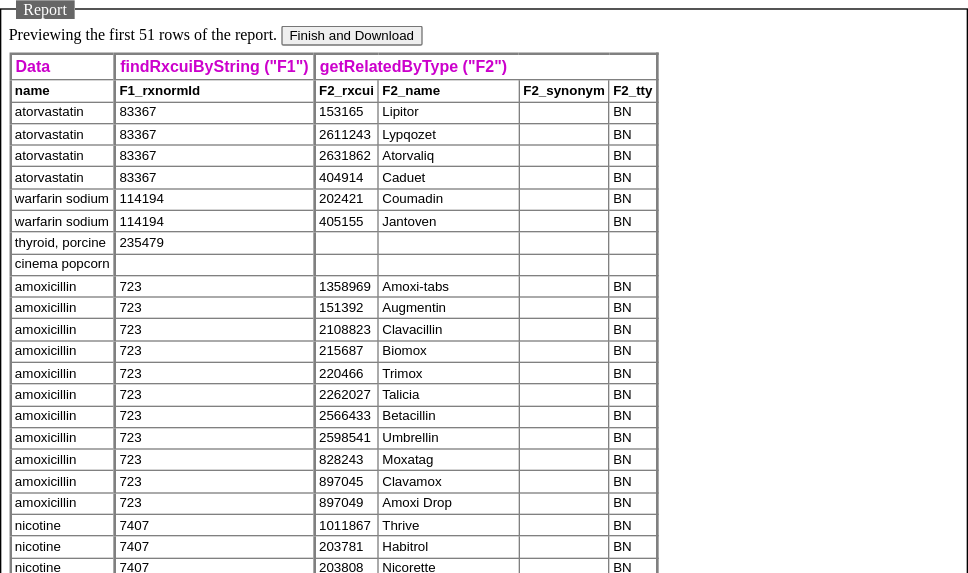
Studying the report preview, we notice that RxMix includes all inputs and intermediate results, even if they did not lead all the way to a final result.
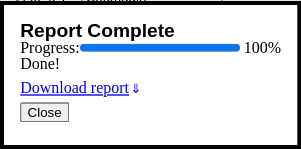
We choose "Finish and Download".
When the report is done, we choose "Download report":
The report might be called "table.txt" or something similar. It should be found wherever your web browser usually puts "downloads".
The report is tab-separated text, with column headings in the first line: pictured below in Windows Notepad and imported into a spreadsheet in Microsoft Excel.
Tip: Designate all fields as "text" (as opposed to "general" or "number") when importing RxMix reports into spreadsheets or other tools to avoid loss of precision or loss of significant leading zeros that might result from processing such fields as numbers.
Next, we will save the workflow in case we might like to return to it later.
You can save a workflow as a file or as a bookmark.
| Save as... | What's included | To save the workflow... | To revisit the workflow... |
|---|---|---|---|
| File | API functions | Choose "Export" in RxMix. The file may be called "workflow.txt" or something similar. Look for it wherever the web browser usually puts downloads. | Choose "Import" in RxMix (when the workflow section is blank). |
| Bookmark | API functions and single sample data value if any | Bookmark, Copy, or share the full RxMix page address (URL) using the corresponding features of the web browser. | Reopen the bookmark or paste the URL into a web browser. |
In place of a batch data file of your own, you can use any compatible dataset offered by the APIs, such as "all RxNorm concepts", "RxClass classes", and some variations on those.
Continuing our example – finding brands related to a named concept – we will use a list of all branded packs (a relatively short list).
Tip: We started our workflow with findRxcuiByString. Therefore, RxMix offered data sets of names. However, inasmuch as the next step of our workflow required an RxCUI, we could make a faster-running workflow by omitting findRxcuiByString and allowing RxMix to offer data sets of RxCUIs.
We used RxMix to automate a workflow, a series of RxNorm API calls. We pre-tested the API calls with a single data value. We fed a batch file of data values through the workflow. We saved the report and viewed it with desktop tools. We saved or shared the workflow. We learned about using an RxNorm dataset as batch input.